What Is SOFRIQ Publish?
SOFRIQ Publish is a social media scheduling workspace where you can prepare, schedule and manage posts for Pinterest, Facebook and Instagram. Because you can manage multiple connected accounts and destinations from one place, you can add your content to an organised publishing queue.
Instead of publishing each post manually, Publish publishes according to a planned schedule. You select a date range, a posting frequency and a publishing time. SOFRIQ then generates the required post slots (number of posts based on the date range and frequency you’ve selected), and you can review the image and content for each slot.
On the Publish dashboard, you see status counters for your schedules and a complete list of scheduled posts. This lets you identify Pending, Processing, Published and Rejected posts.
Before You Start Using Publish
Before you activate a publishing schedule, make sure your social account and destination are connected correctly. If a connected account is missing or no destination is selected, the schedule can't be fully activated.
What You Need to Connect
To use SOFRIQ Publish, you need to connect at least one supported social account. After you select an account, you also select the platform’s destination:
- On Pinterest, you select a Pinterest Board along with the connected account.
- On Facebook, you can select a connected Page as the publishing destination.
- On Instagram, the connected Instagram account itself is the publishing destination.
If a social account’s authorisation expires or is revoked, Publish can’t use that account for publishing. In that case, you may need to reconnect the account from the Channels section.
Supported Social Channels
SOFRIQ Publish is built for these channels:
- Pinterest: To schedule Pins to selected Boards.
- Facebook: To publish social posts to connected Facebook Pages.
- Instagram: To schedule and publish posts to connected Instagram accounts.
Channel availability, permissions and connection status may depend on your account authorisation and SOFRIQ plan limits. We're continuously working on the other channels. New Channels will be available in the channels list.
How to Set Up Publish
The schedule creation workflow is divided into three steps. After you complete the selections in each step, you can use the Continue button to move to the next one.
Open SOFRIQ Publish
- Sign in to your SOFRIQ dashboard.
- Open My App.
- Select Publish.
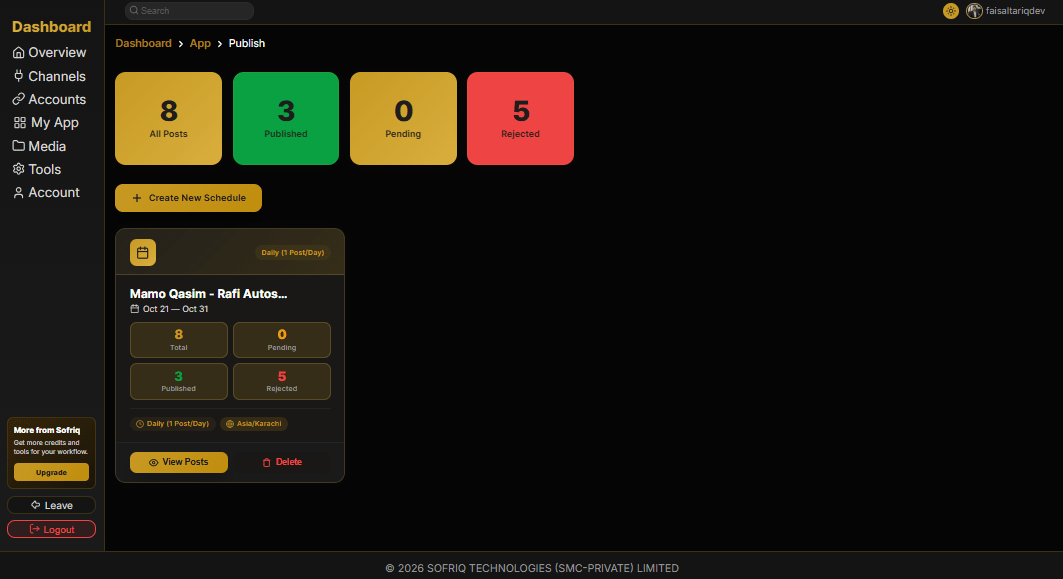
- In the Publish overview, click Create New Schedule.
From the status cards on the Publish page, you can see the number of all schedules, published posts, pending posts and rejected posts.
Connect a Social Account
You must authorise a platform before you create a schedule. Through SOFRIQ’s social connection permissions, you connect your supported account.
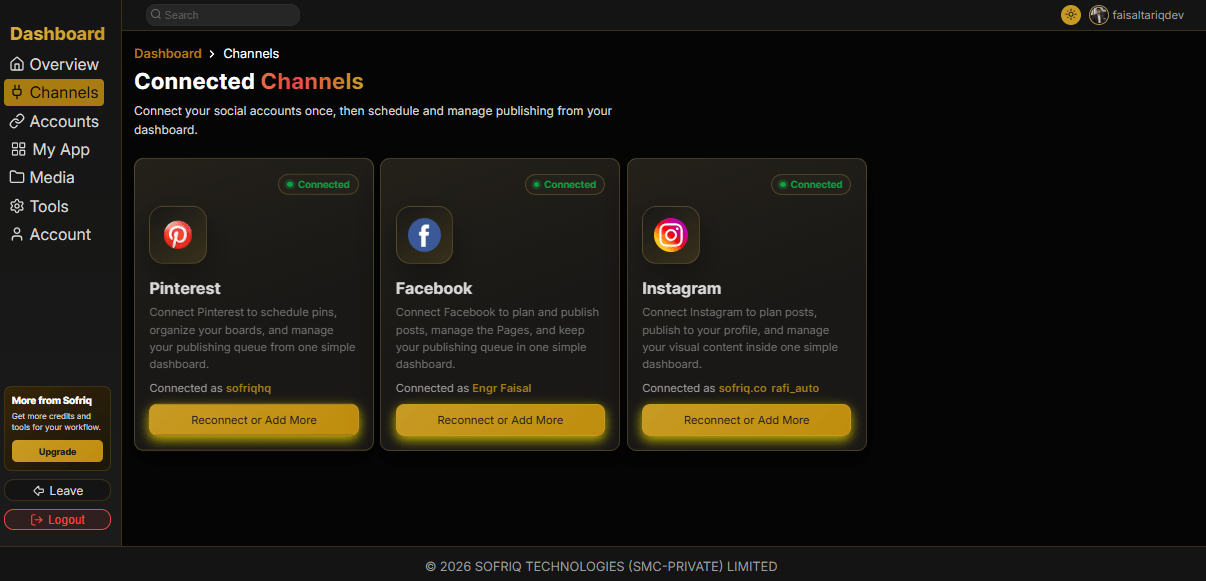
- Open Channels from the dashboard.
- Choose Pinterest, Facebook or Instagram to connect.
- Complete the platform's authorisation process.
- After authorisation, the account becomes available in Publish’s account selection.
If the channel connection is incomplete, the authorisation expires, or required permissions are missing, Publish can't use the account for publishing. After you resolve the account details and permission issues, the connection can become available again.
Choose Publishing Destinations
A destination is the exact social location where a scheduled post will be published. A channel and a destination are different concepts: the channel identifies the platform, while the destination identifies the exact profile, Page or Board inside that platform.
When you create a schedule, select the channel and connected account first, then choose the destination:
- For Pinterest, select a Board.
- For Facebook, select a Page.
- For Instagram, select the connected Instagram account as the destination. Each user can have multiple accounts based on plan.
Each channel requires at least one destination. If no destination is selected, the publishing schedule can't be activated.
Create a Schedule
In the schedule configuration, you set the publishing timeframe and timing.
- Enter a unique schedule name, eg., "Summer Offer, October Posts"
- Select a timezone. The timezone is automatically selected; you just need to confirm. The timezone of any post can't be edited after the schedule is activated.
- Set the start and end dates of the schedule.
- Choose a posting frequency: daily, every second day, every third day, business days or weekends.
- Enter the time at which posts should be published.
- Click Generate to create the required post slots for the selected period. Post slots are the number of posts that will be published on your selected destinations. You need to upload images according to these numbers in the next step.
The timezone defines the local publishing time of the schedule. Selecting the wrong timezone can cause a post to be scheduled at a different time than expected. The timezone used for the schedule should match the publishing worker's calendar.
Add Images and Post Content
Each generated post slot requires one image. To add content, open the Add button and select images from the Media Library or upload them from your device.
After you assign an image, you can review or add the following information inside each post slot:
- Post title
- Post description or caption
- Optional destination link
- You can Generate Title & description from AI at one click for all posts.
Uploaded images will be saved in the SOFRIQ Media Library and reused in future schedules or in other apps. The required number of image slots must be complete for each schedule.
Review and Activate the Queue
Before you click Confirm & Activate, review the schedule preview:
- Schedule name and date range
- Timezone and publishing frequency
- Selected channels and destinations
- Required images and post slots
- Post title, description and link
- Available publishing credits
When all required information is complete and credits are available, Confirm & Activate Queue activates the schedule. After activation, posts may show a Pending or Processing status until the publishing process is complete.
How SOFRIQ Publish Handles Multiple Channels
SOFRIQ Publish lets you use one schedule across multiple channels and destinations, but each platform's content and destination requirements may differ.
Publishing to Multiple Channels
A single schedule can combine Pinterest, Facebook and Instagram. For each selected platform, you need to select a connected account and a destination. Before you select multiple channels, check the platform-specific requirements. Caption limits, image ratio, account permissions and destination rules may vary by platform.
Publishing to Multiple Destinations
Facebook and Pinterest destination limits are set according to your SOFRIQ plan. Within one connected account, one or more destinations can be selected if the account and your plan allow it.
For Instagram, the selected account itself is treated as the destination. After you select destinations, the schedule associates each active post with the selected channel locations.
Publish Credits and Limits
In Publish, 2 credits are reserved for each scheduled post slot. For example, for 10 generated posts, activating the schedule may require 20 credits.
Credits are reserved when the schedule is activated. If the required credits aren't available, the schedule isn't activated, and SOFRIQ shows a "Not enough credits" message.
AI Generation also consumes credits. Each post requires 1 credit. AI credits will be consumed when the user generates AI copy for a post. The user can select multiple posts at once to generate AI copy efficiently.
Connected account limits, destination limits, media upload limits and monthly publishing credits may differ by plan. A watermark may also be applied to scheduled images and description or caption on the Free plan.
Common Publishing Problems
You may run into these common issues when you create a new Publish schedule:
- No connected account: Authorise a supported channel and verify it in the accounts section.
- Destination missing: Select the required Page, Board or Instagram destination for the channel's selected account.
- Wrong timezone: Choose the correct timezone for your schedule and expected publishing time.
- Not enough credits: Compare the number of generated posts with your available credits, or upgrade your plan.
- Missing or invalid image: Add a supported, valid image to every post slot.
- Expired social connection: Reconnect the channel from the Channels section of the dashboard.
- Post rejected: Check the selected destination's permissions, the platform's response and the post requirements.
Common Questions About SOFRIQ Publish
What Is a Destination in SOFRIQ Publish?
A destination is the exact platform location where a scheduled post will be published. A channel identifies the social network, while a destination identifies the exact Page, Board or account inside that network. For example, a Pinterest channel can use a selected Board as its destination, Facebook can use a connected Page, and Instagram uses the connected Instagram account as the publishing location.
Can I Schedule One Post to Multiple Channels at Once?
Yes, if the required accounts and destinations are connected, you can include multiple supported channels in one schedule. Each channel must have a valid connected account and destination. If a channel requires account authorization or additional permissions, it will not be included until the connection is ready.
How Many Credits Does a Scheduled Post Use?
Each scheduled post uses 2 SOFRIQ Publish credits. SOFRIQ reserves credits for every generated post slot when the schedule is activated. The total requirement equals the number of posts multiplied by 2, so you should review the available credit balance before activating the queue.
Next Steps
After you understand the complete SOFRIQ Publish workflow, continue with the setup guides most relevant to your account:
- Connect your social channels to authorise Pinterest, Facebook and Instagram accounts.
- Choose destinations to understand Boards, Facebook Pages and Instagram publishing locations.
- Upload images for your posts to manage reusable images through the SOFRIQ Media Library.
- Create a schedule for timezone, dates, frequencies and slot generation details.
- Use AI copy to prepare captions and descriptions for scheduled content.